はじめに
皆様こんにちは。
AMDlab Webエンジニアの塚田です。
今回ですが、以下の仕組みを作成したいと思います。
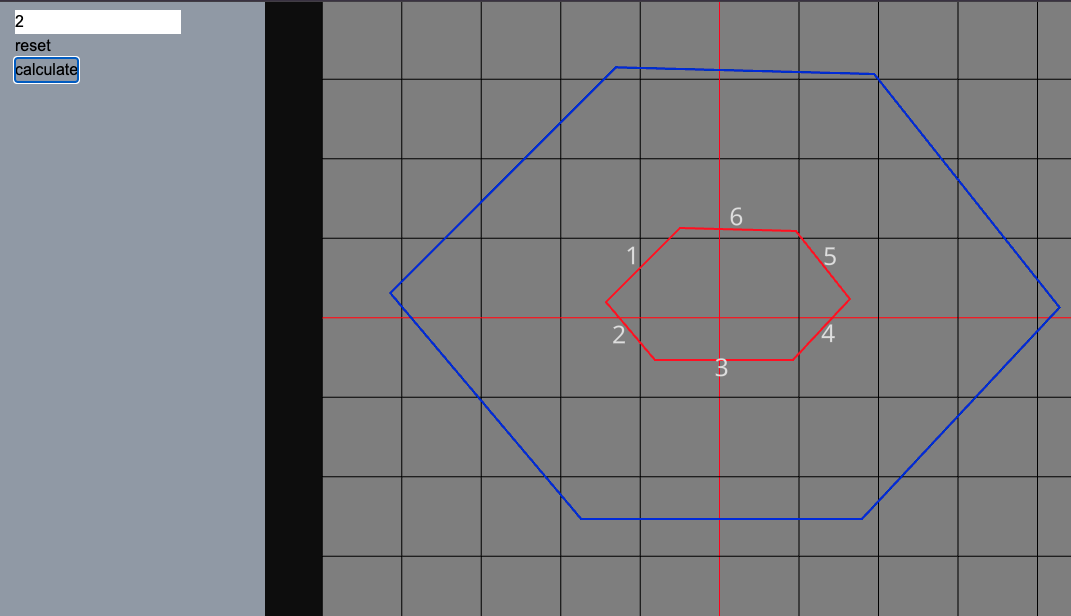
①ブラウザ上でポリライン等の入力→②サーバー側flask(python)でポリラインのオフセット処理を行う→③ブラウザ上にオフセット処理後のポリラインを表示する
説明
開発環境
バックエンド
Flask
※ポリラインの操作としてPython用の幾何学ライブラリShapelyを使用します。
フロントエンド
Next.js
※React-three/fiber、Dreiについては事前に準備してください。
ソースコード解説
バックエンド
バックエンド側のフォルダ構成
|
1 2 3 4 5 6 7 8 9 10 |
app/ ├── app/ │ ├── component/ │ │ ├── json_converter.py │ │ ├── offset_polyline.py │ ├── main.py │ ├── __init__.py ├── docker-compose.yml ├── Dockerfile └── requirements.txt |
ソースコード
|
1 2 3 4 5 6 7 8 9 10 |
# json_converter.py import json def parse_json(json_input): try: return json.loads(json_input) except json.JSONDecodeError as e: print(f"Error decoding JSON: {e}") return None |
リクエストで受け取るjsonを読み込む関数です。
|
1 2 3 4 5 6 7 8 9 10 11 12 13 14 |
# offset_polyline.py from shapely.geometry import Polygon def offset_polygon_3d(points, distance): projected_points_2d = [(x, y) for x, y, z in points] polygon_2d = Polygon(projected_points_2d) offset_polygon_2d = polygon_2d.buffer(distance, join_style=2) offset_polygon_coords_2d = list(offset_polygon_2d.exterior.coords) offset_polygon_coords_3d = [(x, y, 0) for x, y in offset_polygon_coords_2d] return offset_polygon_coords_3d |
ポリラインのオフセットを処理する関数です。Python用の幾何学ライブラリShapelyを利用して、ポリラインの各点からポリゴンを生成して、外側、又は内側に形状を維持したまま各点を膨張(縮小)させる処理を行なっています。
公式ドキュメント
The Shapely User Manual
|
1 2 3 4 5 6 7 8 9 10 11 12 13 14 15 16 17 18 19 20 21 22 23 24 25 26 27 28 29 30 31 32 33 34 35 36 37 |
# main.py import logging from flask import Flask, request, jsonify from flask_cors import CORS from component import json_converter from component import offset_polyline app = Flask(__name__) CORS(app, resources={r"/api/*": {"origins": "http://localhost:3000"}}) # ロギングの設定 logging.basicConfig(level=logging.INFO) logger = logging.getLogger(__name__) @app.route('/api/calcResult', methods=['POST']) def calc_result(): try: json_params = json_converter.parse_json(request.json['jsonData']) points_data = json_params['points'] offset_distance = json_params['distance'] points_as_tuples = [(point['x'], point['y'], point['z']) for point in points_data] offset = offset_polyline.offset_polygon_3d(points_as_tuples, offset_distance) return jsonify({ 'offset': offset }) except Exception as e: # エラーメッセージをログに出力 logger.error("Error: %s", str(e)) return jsonify({'error': 'Internal Server Error'}), 500 if __name__ == "__main__": app.run(host="0.0.0.0", port=5000) |
バックエンドのmain関数です。リクエストを受け取り、jsonを読み込んで、読み込んだjsonの値に従って形状を維持したまま各点を膨張(縮小)させ、変更した各点の値をレスポンスとして返却します。
フロントエンド側のフォルダ構成
|
1 2 3 4 5 6 7 8 9 10 |
app/ ├── components/ │ ├── calcResultButton.tsx │ ├── lineWithText.tsx ├── threeProcess/ │ ├── page.tsx ├── utils/ │ ├── calculate.ts ├── layout.tsx └── page.tsx |
ソースコード
|
1 2 3 4 5 6 7 8 9 10 11 12 13 14 15 16 17 18 19 20 21 22 23 24 25 26 27 28 29 30 31 32 33 34 35 36 37 38 39 40 41 42 |
// calcResultButton.tsx "use client"; import React from "react"; import * as THREE from "three"; type Props = { points: THREE.Vector3[]; distance: number; setOffsetPoints: React.Dispatch<React.SetStateAction<THREE.Vector3[]>>; }; const CalculateResultButton: React.FC<Props> = ({ points, distance, setOffsetPoints, }) => { const handleCalculateClick = async () => { const requestPayload = JSON.stringify({ points: points, distance: distance, }); const response = await fetch("http://localhost:5000/api/calcResult", { method: "POST", headers: { "Content-Type": "application/json" }, body: JSON.stringify({ jsonData: requestPayload }), }); const responseData = await response.json(); const calculatedOffsetPoints = responseData["offset"].map( (point: number[]) => new THREE.Vector3(point[0], point[1], point[2]) ); setOffsetPoints(calculatedOffsetPoints); }; return ( <button className="text-black" onClick={handleCalculateClick}> Calculate </button> ); }; export default CalculateResultButton; |
バックエンドにオフセット計算用のjsonを作成、リクエストを送ります。サーバー側からレスポンスを受け取ってオフセットされた各点の値をTHREE.Vector3に変換してstate変数の配列に格納します。
|
1 2 3 4 5 6 7 8 9 10 11 12 13 14 15 16 17 18 19 20 21 22 23 24 25 26 27 28 29 30 31 32 33 34 35 36 37 38 39 40 41 42 43 44 45 46 47 48 49 50 51 52 53 54 55 56 57 58 59 60 61 62 63 64 65 66 67 68 69 70 71 72 73 74 |
// lineWithText.tsx import React from "react"; import { Line, Text } from "@react-three/drei"; import * as THREE from "three"; import { calculateMidpoint } from "../utils/calculate"; interface LineWithTextProps { points: THREE.Vector3[]; showText: boolean; color: string; } const LineWithText: React.FC<LineWithTextProps> = ({ points, showText, color, }) => { return ( <> {points.length > 1 && points.map( (point, index: number) => index < points.length - 1 && ( <React.Fragment key={`fragment-${index}`}> <Line key={`line-${index}`} points={[ new THREE.Vector3(point.x, point.y, point.z), new THREE.Vector3( points[index + 1].x, points[index + 1].y, point.z ), ]} color={color} lineWidth={2} depthTest={false} renderOrder={1} onPointerEnter={() => { document.body.style.cursor = "pointer"; }} onPointerLeave={() => { document.body.style.cursor = "default"; }} ></Line> {showText && ( <Text key={`text-${index}`} color={"white"} anchorY={"middle"} scale={0.3} position={calculateMidpoint( new THREE.Vector3(point.x, point.y, 0.2), new THREE.Vector3( points[index + 1].x, points[index + 1].y, 0.2 ), 0.1 )} rotation={[0, 0, 0]} depthOffset={0} > {index + 1} </Text> )} </React.Fragment> ) )} </> ); }; export default LineWithText; |
各点から線分を作成して表示します。
|
1 2 3 4 5 6 7 8 9 10 11 12 13 14 15 16 17 18 19 20 21 22 23 24 25 26 27 28 29 30 31 32 33 34 35 36 37 38 39 40 41 42 43 |
// calculate.ts import * as THREE from "three"; export const calculateMidpoint = ( current: THREE.Vector3, prev: THREE.Vector3, offset = 0.1 ): THREE.Vector3 => { const midpoint = new THREE.Vector3( (current.x + prev.x) / 2, (current.y + prev.y) / 2, (current.z + prev.z) / 2 ); const lineDirection = new THREE.Vector3() .subVectors(current, prev) .normalize(); const perpendicularDir = new THREE.Vector3( -lineDirection.y, lineDirection.x, 0 ).normalize(); const adjustedMidpoint = midpoint .clone() .add(perpendicularDir.multiplyScalar(offset)); return adjustedMidpoint; }; export const isPointClose = ( point: THREE.Vector3, radius: number, x: number, y: number ) => { const distanceToPoint = new THREE.Vector3(x, y, 0).distanceTo(point); return distanceToPoint <= radius; }; export const sanitizeInputNumber = (value: string): number => { const sanitizedValue = value.replace(/^0+(?=\d)/, ""); return Number(sanitizedValue); }; |
今回の処理で必要な計算の関数です。説明は割愛します。
|
1 2 3 4 5 6 7 8 9 10 11 12 13 14 15 16 17 18 19 20 21 22 23 24 25 26 27 28 29 30 31 32 33 34 35 36 37 38 39 40 41 42 43 44 45 46 47 48 49 50 51 52 53 54 55 56 57 58 59 60 61 62 63 64 65 66 67 68 69 70 71 72 73 74 75 76 77 78 79 80 81 82 83 84 85 86 87 88 89 90 91 92 93 94 95 96 97 98 99 100 101 102 103 104 105 106 107 108 109 110 |
// page.tsx "use client"; import { Canvas, ThreeEvent } from "@react-three/fiber"; import { GizmoHelper, GizmoViewport, OrbitControls, Plane, } from "@react-three/drei"; import { useState } from "react"; import * as THREE from "three"; import React from "react"; import CalcResultButton from "../components/calcResultButton"; import LineWithText from "../components/lineWithText"; import { isPointClose, sanitizeInputNumber } from "../utils/calculate"; export default function ThreeProcess() { const [points, setPoints] = useState<THREE.Vector3[]>([]); const [distance, setDistance] = useState<number>(0); const [offsetPoints, setOffsetPoints] = useState<THREE.Vector3[]>([]); const [isClosed, setIsClosed] = useState<boolean>(false); const handleCanvasClick = (event: ThreeEvent<MouseEvent>) => { event.stopPropagation(); if (isClosed) return; const { x, y } = event.point; if (points.length > 2 && isPointClose(points[0], 0.5, x, y)) { setPoints([...points, new THREE.Vector3(points[0].x, points[0].y, 0)]); setIsClosed(true); } else { setPoints([...points, new THREE.Vector3(x, y, 0)]); } }; const resetPoints = () => { setPoints([]); setOffsetPoints([]); setIsClosed(false); }; return ( <div className="flex h-screen"> <div className="w-1/5 pl-4 pt-2 bg-gray-400"> <div> <input className="text-black" title="dist" type="number" placeholder="0" value={distance.toString()} min={-2} onChange={(e) => { const dist = sanitizeInputNumber(e.target.value); setDistance(dist); }} /> </div> <div> <button title="reset" className="text-black" onClick={resetPoints}> reset </button> </div> <div> <CalcResultButton points={points} distance={distance} setOffsetPoints={setOffsetPoints} /> </div> </div> <div className="w-4/5 h-screen"> <Canvas> <Plane rotation={[0, 0, 0]} position={[0, 0.5, 0]} scale={[0.5, 0.5, 1]} onClick={handleCanvasClick} args={[20, 20]} > <meshStandardMaterial color="grey" /> </Plane> <LineWithText points={points} color="red" showText /> <LineWithText points={offsetPoints} color="blue" showText={false} /> <gridHelper position={[0, 0.01, 0]} rotation={[Math.PI / 2, 0, 0]} args={[10, 10, "red", "black"]} /> <GizmoHelper alignment="bottom-right" margin={[80, 80]}> <GizmoViewport axisColors={["red", "green", "blue"]} labelColor="black" /> </GizmoHelper> <ambientLight intensity={3.0} /> <pointLight position={[10, 10, 10]} /> <OrbitControls makeDefault enablePan={true} enableZoom={true} enableRotate={false} zoomToCursor /> </Canvas> </div> </div> ); } |
http://localhost:3000/threeProcess にアクセスしたときに表示されるページです。オフセット前の形状を入力しCalcResultButtonコンポーネント内のボタンを押すことで、オフセット後の形状用の各点を取得して画面上に線分として表示します。
実行結果
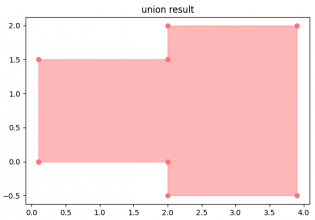
左上の値に従って形状の大きさが拡大されることがわかります。負の数を入れると縮小されます。
まとめ
今回のプロジェクトの作成でサーバー側で幾何学計算を実行する仕組みができました。これをもとに今後幾何学操作の機能を追加していければと思います。
AMDlabでは、開発に力を貸していただけるエンジニアさんを大募集しております。
少しでもご興味をお持ちいただけましたら、カジュアルにお話するだけでも大丈夫ですのでお気軽にご連絡ください!
中途求人ページ: https://www.amd-lab.com/recruit-list/mid-career
カジュアル面談がエントリーフォームからできるようになりました。
採用種別を「カジュアル面談(オンライン)」にして必要事項を記載の上送信してください!
エントリーフォーム: https://www.amd-lab.com/entry



COMMENTS