AMDlab河野です。
皆さんChatGPT使ってますか?私は使ってます。
Revitの面倒な作業や操作をChatGPTがやってくれると楽ですよね。
今日はChatGPTにRevitを操作させる「Revit Copilot」の実装例の紹介です。
シンプルかつ大胆な作戦は以下のとおりです。
- Revit上でプロンプトを書けるUIを作成する
- ChatGPTにソースコード(RevitAPI)(C#)を書かせる
- ソースコードをリアルタイムにコンパイルして実行する
- つくったプログラムをRevitアドインにする
本当に実現できるのか?やってみましょう。
コードは以下にアップしています。
https://github.com/AMDlab/RevitCopilot
その前に、Revitアドインの最初の一歩は以下の記事をご参照くださいね。
Revit上でプロンプトを書けるUIを作成する
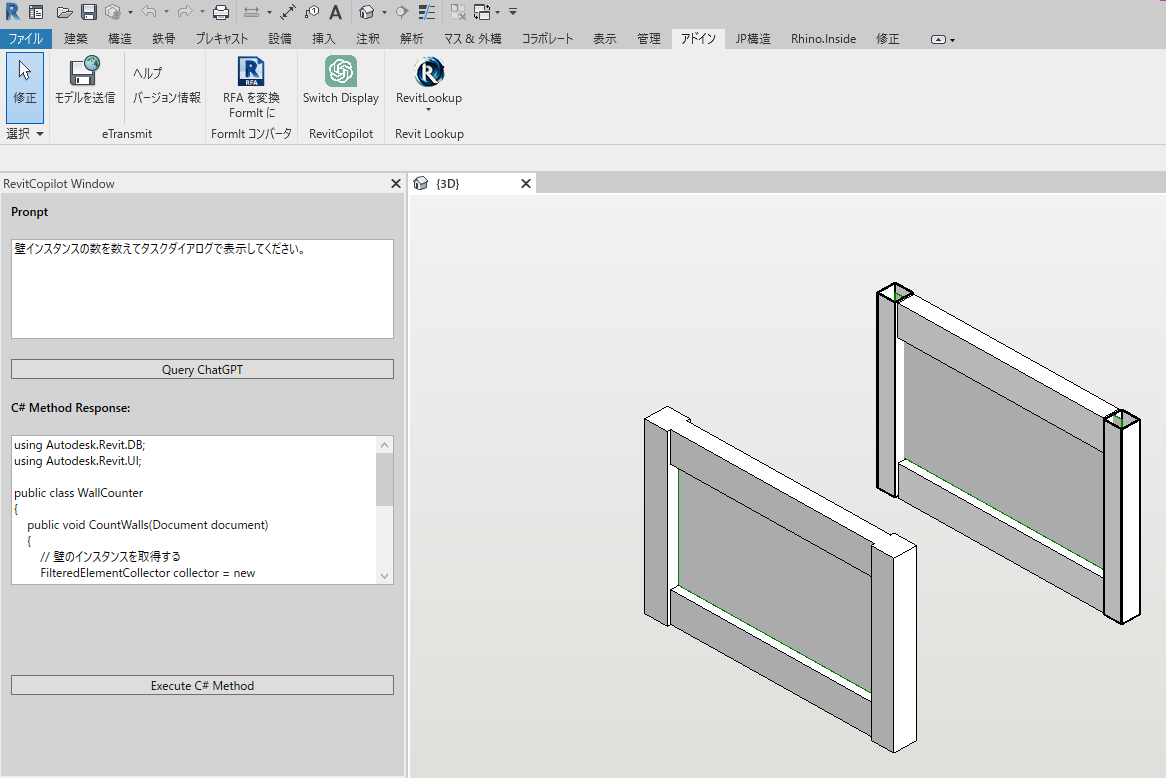
DockablePaneを利用します。
DockablePaneはRevitAPIが提供しているUIで、xamlを用いて記述でき、モーダレスに動作します。
また、その名の通りですがお馴染みのプロパティブラウザやプロジェクトブラウザにドッキングさせることができます。
モーダレスということでRevitのドキュメントを変更することは出来ませんが、今後の課題とし、今回は動くところまでいきます。
※ソースコードは以下のページを参考にしています。
https://thebuildingcoder.typepad.com/blog/2013/05/a-simpler-dockable-panel-sample.html
View(xaml+コードビハインド)とViewModelを示します。
ちなみに、xamlはChatGPTに書いてもらいました。大雑把ですが、動くものであれば良いでしょう。
|
1 2 3 4 5 6 7 8 9 10 11 12 13 14 15 16 17 18 19 20 21 22 23 24 25 26 27 28 29 30 31 32 33 34 35 36 37 38 |
<Page x:Class="RevitCopilot.RevitCopilotView" xmlns="http://schemas.microsoft.com/winfx/2006/xaml/presentation" xmlns:x="http://schemas.microsoft.com/winfx/2006/xaml" xmlns:d="http://schemas.microsoft.com/expression/blend/2008" xmlns:mc="http://schemas.openxmlformats.org/markup-compatibility/2006" Title="Revit Copilot Window" Height="559" Width="200" Background="LightGray" > <DockPanel> <!-- Prompt input text box --> <TextBlock x:Name="pronptTitle" DockPanel.Dock="Top" Margin="10" Text="Pronpt" FontWeight="Bold"></TextBlock> <TextBox x:Name="txtPromptInput" DockPanel.Dock="Top" Margin="10" TextWrapping="Wrap" AcceptsReturn="True" VerticalScrollBarVisibility="Auto" Height="100" Text="{Binding Path=Prompt, Mode=TwoWay, UpdateSourceTrigger=PropertyChanged}"> </TextBox> <!-- Query ChatGPT button --> <Button x:Name="pronpt" DockPanel.Dock="Top" Margin="10" Content="Query ChatGPT" Click="BtnQueryChatGPT_Click" Height="20"> </Button> <!-- Code block to display and edit C# method response --> <TextBlock x:Name="responceTitle" DockPanel.Dock="Top" Margin="10" Text="C# Method Response:" FontWeight="Bold"></TextBlock> <TextBox x:Name="responce" DockPanel.Dock="Top" Margin="10" TextWrapping="Wrap" AcceptsReturn="True" VerticalScrollBarVisibility="Auto" Height="150" Text="{Binding Path=CsMethod, Mode=TwoWay, UpdateSourceTrigger=PropertyChanged}"> </TextBox> <!-- Execute C# method button --> <Button x:Name="btnExecuteCSharpMethod" DockPanel.Dock="Top" Margin="10" Content="Execute C# Method" Click="BtnExecuteCSharpMethod_Click" Height="20"> </Button> </DockPanel> </Page> |
|
1 2 3 4 5 6 7 8 9 10 11 12 13 14 15 16 17 18 19 20 21 22 23 24 25 26 27 28 29 30 31 32 33 34 35 36 37 38 39 40 41 42 43 44 45 46 47 48 49 50 51 52 53 54 55 56 57 |
using Autodesk.Revit.UI; using RevitCopilot.Model; using System; using System.Windows; using System.Windows.Controls; namespace RevitCopilot { public partial class RevitCopilotView : Page, IDockablePaneProvider { private RevitCopilotViewModel vm = new RevitCopilotViewModel(); public RevitCopilotViewModel GetVM() => vm; public RevitCopilotView() { InitializeComponent(); this.DataContext = vm; } public void SetupDockablePane(DockablePaneProviderData data) { data.FrameworkElement = this; data.InitialState = new DockablePaneState { DockPosition = DockPosition.Tabbed, TabBehind = DockablePanes.BuiltInDockablePanes.ProjectBrowser }; } private void BtnQueryChatGPT_Click(object sender, RoutedEventArgs e) { try { var chatGpt = new RevitCopilotManager(); vm.CsMethod = chatGpt.GetCsMethodByChatgpt(vm.Prompt); } catch (Exception ex) { TaskDialog.Show("Error", ex.Message); } } private void BtnExecuteCSharpMethod_Click(object sender, RoutedEventArgs e) { try { var compiler = new CompileManager(); compiler.Compile(vm.CsMethod); } catch (Exception ex) { TaskDialog.Show("Error", ex.Message); } } } } |
|
1 2 3 4 5 6 7 8 9 10 11 12 13 14 15 16 17 18 19 20 21 22 23 24 25 26 27 28 29 30 31 32 33 34 35 36 37 38 39 40 41 42 43 44 45 46 47 |
using System.ComponentModel; namespace RevitCopilot { public class RevitCopilotViewModel : INotifyPropertyChanged { public virtual event PropertyChangedEventHandler PropertyChanged = delegate { }; private string prompt = "壁インスタンスの数を数えてタスクダイアログで表示してください。"; public string Prompt { get => prompt; set { prompt = value; PropertyChanged(this, new PropertyChangedEventArgs(nameof(Prompt))); } } private string csMethod = "using Autodesk.Revit.DB;" + "\nusing Autodesk.Revit.UI;" + "\n" + "\npublic class WallCounter" + "\n{" + "\n public void CountWalls(Document document)" + "\n {" + "\n // 壁のインスタンスを取得する" + "\n FilteredElementCollector collector = new FilteredElementCollector(document);" + "\n collector.OfCategory(BuiltInCategory.OST_Walls).WhereElementIsNotElementType();" + "\n int wallCount = collector.ToElements().Count;" + "\n" + "\n // タスクダイアログに壁のインスタンス数を表示する" + "\n TaskDialog.Show(\"Wall Count\", \"The number of wall instances is \" + wallCount.ToString() + \".\");" + "\n }" + "\n}" + "\n"; public string CsMethod { get => csMethod; set { csMethod = value; PropertyChanged(this, new PropertyChangedEventArgs(nameof(CsMethod))); } } } } |
xamlの以下の記述により、ViewModelの
Prompt 、
CsMethod とバインドしています。
Text="{Binding Path=Prompt, Mode=TwoWay, UpdateSourceTrigger=PropertyChanged}"
Text="{Binding Path=CsMethod, Mode=TwoWay, UpdateSourceTrigger=PropertyChanged}"
これにより、UIでの変更がプログラムに反映されます。
深く知りたい場合はMVVMパターンで検索してみてください。
なお、 Prompt 、 CsMethod に初期値を入れているのはデバッグで起動しなおす度に入力するのが大変なためです。
RevitCopilotManager と CompileManager に関してはロジック部分なので後述します。
ChatGPTにソースコード(RevitAPI)(C#)を書かせる
C#(.NET)からChatGPTにリクエストを送るライブラリはいくつかありますが、
This is the only .net Framework ChatGPT API You Can use
の文言に誘われてChatGPT.API.Frameworkを使います。
以下、
RevitCopilotManager の実装です。
|
1 2 3 4 5 6 7 8 9 10 11 12 13 14 15 16 17 18 19 20 21 22 23 24 25 26 27 28 29 30 31 32 33 34 35 36 37 38 39 40 41 42 43 44 45 46 47 48 49 50 51 52 53 54 55 56 57 58 59 60 61 62 63 64 65 66 67 68 69 |
using ChatGPT.API.Framework; namespace RevitCopilot.Model { public class RevitCopilotManager { public string GetCsMethodByChatgpt(string content) { var response = InqueryChatgpt(content); var csMethod = GetCsMethodFromResponse(response); return csMethod; } private string InqueryChatgpt(string content) { ChatGPTClient cgc = new ChatGPTClient("xxxxxxxxxxxxxxxxxxxxxxxxxxxxxxxxxxxxxxxxxxxxxxxxxxx"); cgc.CreateCompletions("hoge", "あなたはRevitアドインの開発者です。" + "ユーザーの問い合わせに返答するためのC#クラスとメソッドを作成してください。" + "以下のルールを必ず守ってください。" + "・クラスは1つのみ作成する" + "・メソッドは、クラスメソッドとして1つのみ作成する" + "・メソッドの引数は(Autodesk.Revit.DB.Document document)とする" + "・static修飾子は使用しない" ); var res = cgc.Ask("hoge", content); if(res != null) { return res.GetMessageContent(); } return null; } private string GetCsMethodFromResponse(string response) { var rowList = response.Split('\n'); bool isTarget = false; int staCounter = 0, endCounter = 0; var res = string.Empty; foreach (var row in rowList) { if (row.StartsWith("```")) { isTarget = !isTarget; continue; } if (isTarget) { if (row.Contains("{")) staCounter += CharCount(row, '{'); if (row.Contains("}")) endCounter += CharCount(row, '}'); res += row + "\n"; if (staCounter > 0 && staCounter == endCounter) { // コードブロックが終わったら終了 break; } } } return res; } private int CharCount(string text, char target) { int count = 0; foreach (char c in text) { if (c == target) { count++; } } return count; } } } |
xxxxxxxxxxxxxxxxxxxxxxxxxxxxxxxxxxxxxxxxxxxxxxxxxxx はご自身のAPIKeyに置き換えてください。
重要なのは以下の部分です。
cgc.CreateCompletions(“hoge”,
“あなたはRevitアドインの開発者です。” +
“ユーザーの問い合わせに返答するためのC#クラスとメソッドを作成してください。” +
“以下のルールを必ず守ってください。” +
“・クラスは1つのみ作成する” +
“・メソッドは、クラスメソッドとして1つのみ作成する” +
“・メソッドの引数は(Autodesk.Revit.DB.Document document)とする” +
“・static修飾子は使用しない”
);
ここの第2引数はChatGPTに投げるSystemMesssageであり、ChatGPTの振る舞いを決定づけます。
この後、ChatGPTが書いたソースコードをコンパイルするので、極力コンパイルが通るようなソースコードを書いてくれるプロンプトを研究しましょう。
今回は、クラス1つメソッド1つを書かせ、メソッドの引数を
Autodesk.Revit.DB.Document document とするように入力してみました。
なお、ChatGPTの返答にはソースコード以外に枕詞等の文言が入っているため、
GetCsMethodFromResponse メソッドでソースコード部分のみを抜き出しています。
ソースコードをリアルタイムにコンパイルして実行する
次に、ChatGPTが書いたソースコードをリアルタイムにコンパイルする CompileManager の実装を示します。
|
1 2 3 4 5 6 7 8 9 10 11 12 13 14 15 16 17 18 19 20 21 22 23 24 25 26 27 28 29 30 31 32 33 34 35 36 37 38 39 40 41 42 43 44 45 46 47 48 49 50 51 52 53 54 55 56 57 58 59 60 61 62 63 64 65 66 |
using Microsoft.CSharp; using System; using System.CodeDom.Compiler; using System.IO; using System.Linq; using System.Reflection; namespace RevitCopilot.Model { public class CompileManager { public void Compile(string csMethod) { // コンパイラのオプションを設定する var options = new CompilerParameters { GenerateInMemory = true, WarningLevel = 4, TreatWarningsAsErrors = false, }; options.ReferencedAssemblies.AddRange(GetDllFileNames()); // コンパイルを実行する var provider = new CSharpCodeProvider(); CompilerResults results = provider.CompileAssemblyFromSource(options, csMethod); if (results.Errors.HasErrors) { // コンパイルエラーがあれば例外とする string exMessage = string.Empty; foreach (CompilerError error in results.Errors) { exMessage += error.ErrorText + Environment.NewLine; } throw new Exception(exMessage); } else { // コンパイルされたアセンブリから、クラスとメソッドを取得する Assembly assembly = results.CompiledAssembly; var classTypes = assembly.GetTypes(); if (classTypes.Count() != 1) { throw new Exception($"クラスが{classTypes.Count()}個存在している。"); } var classType = classTypes[0]; var instance = Activator.CreateInstance(classType, null); var methods = classType.GetMethods(BindingFlags.Public | BindingFlags.Instance | BindingFlags.DeclaredOnly); if (methods.Count() != 1) { throw new Exception($"メソッドが{methods.Count()}個存在している。"); } // メソッドを呼び出す var method = methods.First(); var result = method.Invoke(instance, new object[] { RevitDocuments.Doc }); } } private string[] GetDllFileNames() { string executingAssemblyPath = Assembly.GetExecutingAssembly().Location; string directoryPath = Path.GetDirectoryName(executingAssemblyPath); string[] fileNames = Directory.GetFiles(directoryPath, "*.dll"); return fileNames; } } } |
SystemMesssageで指定しているので、クラスが1つ、メソッドが1つ、メソッドの引数が
Autodesk.Revit.DB.Document documentであることを前提としたコードとなっています。
上記条件で決め打ちでコーディングしているので、ChatGPTの書いたプログラムが指定通りになっていないと例外となります。
ChatGPTの書いたC#メソッドを呼び出しているのは
method.Invoke(instance, new object[] { RevitDocuments.Doc }); 部分で、引数にRevitドキュメントを渡していることが分かるかと思います。
また、意外と重要なのが
GetDllFileNames() です。
ソースコードをコンパイルするためには、利用するライブラリのdllが必要になります。
今回は使いたいライブラリをRevitCopilot.dllと同じディレクトリに格納しておき、
GetDllFileNames()で探しにいく作戦です。
この辺も、プログラムが上手く動作してから詰めていけば良いと思います。
つくったプログラムをRevitアドインにする
これまで作ったプログラムがRevitアドインとして動作するようにします。
今回はボタンが一つしかないため、”アドイン”(英語版”Add-in”)タブにボタンが作られるようにします。
なお、ボタンの動作はDockablePaneの表示/非表示を切り替えるものです。
|
1 2 3 4 5 6 7 8 9 10 11 12 13 14 15 16 17 18 19 20 21 22 23 24 25 26 27 28 29 30 31 32 33 34 35 36 37 38 39 40 41 42 43 44 45 46 47 48 49 50 51 52 53 54 55 56 57 58 59 60 61 62 63 64 65 66 67 68 69 70 71 72 73 74 75 76 77 78 79 80 81 82 83 84 85 86 87 88 89 90 91 92 93 94 95 96 97 98 99 100 101 102 103 104 105 106 |
using System; using System.Diagnostics; using System.Reflection; using System.Windows.Media.Imaging; using Autodesk.Revit.Attributes; using Autodesk.Revit.DB; using Autodesk.Revit.DB.Events; using Autodesk.Revit.UI; using RevitCopilot.Properties; using System.Windows.Interop; namespace RevitCopilot { public class RevitCopilotApp : IExternalApplication { public Result OnStartup(UIControlledApplication a) { // リボンパネルの作成 RibbonPanel panel = a.CreateRibbonPanel("RevitCopilot"); string dllPath = Assembly.GetExecutingAssembly().Location; PushButtonData button = new PushButtonData("SwitchDisplayButton", "Switch Display", dllPath, "RevitCopilot.SwitchDisplay") { LargeImage = GetImage(Resources.ChatgptLogo.GetHbitmap()) }; panel.AddItem(button); // DockablePaneの作成&設定 var dockablePane = new RevitCopilotView(); DockablePaneProviderData dockablePaneProviderData = new DockablePaneProviderData { FrameworkElement = dockablePane, InitialState = new DockablePaneState { DockPosition = DockPosition.Tabbed, TabBehind = DockablePanes.BuiltInDockablePanes.ProjectBrowser } }; dockablePane.SetupDockablePane(dockablePaneProviderData); // DockablePaneの登録 DockablePaneId dpid = new DockablePaneId(new Guid("{D7C963CE-B7CA-426A-8D51-6E8254D21157}")); a.RegisterDockablePane(dpid, "RevitCopilot Window", dockablePane); // イベント登録 a.ControlledApplication.DocumentOpened += DocumentOpened; a.ControlledApplication.DocumentChanged += DocumentChanged; return Result.Succeeded; } private void DocumentOpened(object sender, DocumentOpenedEventArgs e) { // Revitドキュメントを設定 var res = RevitDocuments.SetRevitDocuments(e.Document); Debug.Assert(res); } public Result OnShutdown(UIControlledApplication a) { return Result.Succeeded; } private void DocumentChanged(object sender, DocumentChangedEventArgs e) { // Revitドキュメントを設定 var res = RevitDocuments.SetRevitDocuments(e.GetDocument()); Debug.Assert(res); } private BitmapSource GetImage(IntPtr bm) { BitmapSource bmSource = Imaging.CreateBitmapSourceFromHBitmap(bm, IntPtr.Zero, System.Windows.Int32Rect.Empty, BitmapSizeOptions.FromEmptyOptions()); return bmSource; } } /// <summary> /// ボタンに実装するコマンド /// </summary> [Transaction(TransactionMode.ReadOnly)] public class SwitchDisplay : IExternalCommand { public Result Execute( ExternalCommandData commandData, ref string message, ElementSet elements) { DockablePaneId dpid = new DockablePaneId(new Guid("{D7C963CE-B7CA-426A-8D51-6E8254D21157}")); DockablePane dp = commandData.Application.GetDockablePane(dpid); if (dp.IsShown()) { dp.Hide(); } else { dp.Show(); } return Result.Succeeded; } } } |
.addinファイルの作成と設置も忘れないようにしましょう。
|
1 2 3 4 5 6 7 8 9 10 11 |
<?xml version="1.0" encoding="utf-8"?> <RevitAddIns> <AddIn Type="Application"> <Name>RevitCopilot</Name> <Assembly>RevitCopilot\RevitCopilot.dll</Assembly> <AddInId>B6A27CC9-BFD3-4030-9DC0-B97135405C8F</AddInId> <FullClassName>RevitCopilot.RevitCopilotApp</FullClassName> <VendorId>com.amd-lab</VendorId> <VendorDescription>AMDlab Inc., https://amd-lab.com</VendorDescription> </AddIn> </RevitAddIns> |
余談になりますが、
Autodesk.Revit.DB.Document などを静的クラスにまとめておくと便利なのでよくやります。
DocumentChanged イベントでドキュメントが変更されるたびに設定しなおす仕組みです。
|
1 2 3 4 5 6 7 8 9 10 11 12 13 14 15 16 17 18 19 20 21 22 23 24 25 26 27 |
using Autodesk.Revit.ApplicationServices; using Autodesk.Revit.DB; using Autodesk.Revit.UI; namespace RevitCopilot { public static partial class RevitDocuments { public static Document Doc { get; private set; } public static Application App { get; private set; } public static UIDocument UiDoc { get; private set; } public static UIApplication UiApp { get; private set; } public static bool SetRevitDocuments( Document doc ) { if ( doc == null ) return false; Doc = doc; App = Doc.Application; UiDoc = new UIDocument( Doc ); UiApp = new UIApplication( App ); return true; } } } |
完成
Revitを起動して確認してみましょう。
・アドインタブに「Switch Display」ボタンはありますか?
・ChatGPTに問い合わせることができましたか?
・ソースコード部分を抜き出すことができましたか?
・ソースコードをコンパイルして実行することが出来ましたか?
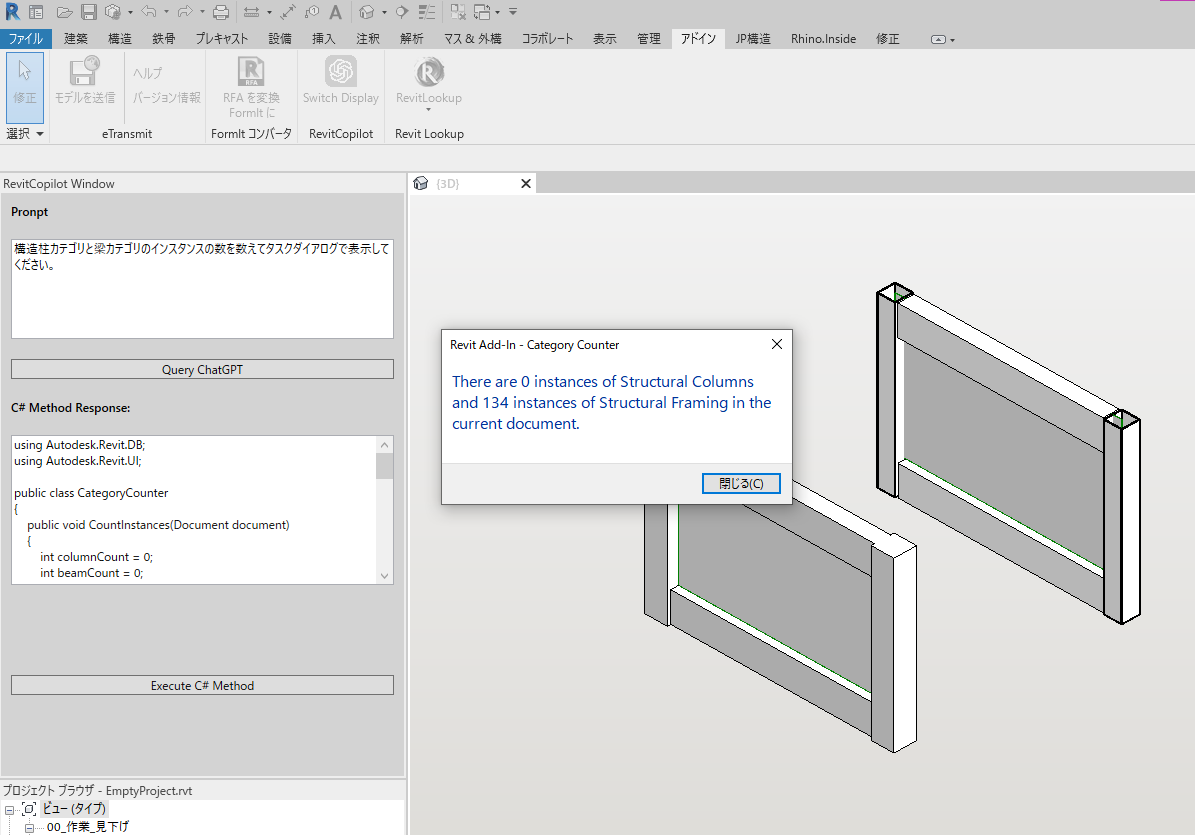
プロンプトを
「「「構造柱カテゴリと梁カテゴリのインスタンスの数を数えてタスクダイアログで表示してください。」」」
に変更して「Query ChatGPT」→「Execute C# Method」を試してみました。
モデルはご覧の通りですが、絶対に間違えていますね・・・。
とはいえ、ChatGPTの返答からソースコードを抜き出してコンパイルして実行する一連の流れが動作するだけでも御の字ではないでしょうか。
精度に関しては今後の課題とし、プロンプトを研究するか、LLM・GPTの更なる進化に期待しましょう。
Revit Copilot、皆さんもぜひ動かしてみてください。





COMMENTS