皆様こんにちは
AMDlabの秋山です。
前回に引き続きZeroTouch Nodeの第2弾です。
今回は、ZeroTouch Nodeを使用して、Revitエレメントを参照する方法、Revitエレメントのパラメータを取得する方法をお話していきます。
作成するノードは、壁エレメントIDから壁の面積を取得するノードになります。
以下が今回作成するコードになります。
|
1 2 3 4 5 6 7 8 9 10 11 12 13 14 15 16 17 18 19 20 21 22 23 24 25 26 27 28 29 30 31 32 33 34 35 36 37 38 39 40 41 42 |
using System; using Autodesk.Revit.DB; using Autodesk.DesignScript.Runtime; using RevitServices.Persistence; using RevitServices.Transactions; namespace RevitZeroTouch { public class GetWallArea { // コンストラクタ private GetWallArea() { } // 壁の面積を取得し、平方メートルに変換するメソッド private static double CalculateWallArea(Wall wall) { if (wall != null) { // パラメータ名を使用して壁の面積を取得 Parameter areaParam = wall.LookupParameter("Area"); if (areaParam != null) { // フィートから平方メートルに変換 double areaInSquareFeet = areaParam.AsDouble(); double areaInSquareMeters = UnitUtils.Convert(areaInSquareFeet, UnitTypeId.SquareFeet, UnitTypeId.SquareMeters); return areaInSquareMeters; } } return 0; } // Dynamo用にエクスポートするメソッド [IsVisibleInDynamoLibrary(true)] public static double GetWallAreaById(int id) { Document doc = DocumentManager.Instance.CurrentDBDocument; Element element = doc.GetElement(new ElementId(id)); Wall wall = element as Wall; return CalculateWallArea(wall); } } } |
上記のコードを簡単に解説していきます。
まず初めに名前空間をインポートします。ライブラリやフレームワークの特定部分を参照するために記述します。
|
1 2 3 4 5 |
using System; using Autodesk.Revit.DB; using Autodesk.DesignScript.Runtime; using RevitServices.Persistence; using RevitServices.Transactions; |
クラスを定義します。
|
1 2 3 4 5 6 |
namespace RevitZeroTouch { public class GetWallArea { // コンストラクタ private GetWallArea() { } |
壁の面積を取得します。Wallクラスのwallオブジェクトがnullでない場合に、壁オブジェクトのパラメータ”面積”から値を取得します。取得した面積が0でない場合に、パラメータの値をdouble型にします。
今回使用したメソッドはWallクラスのメソッドであるLookUpParameter(“面積”)ですが、get_Parameter(BuiltInParameter.HOST_AREA_COMPUTED)でも取得することができます。使い分けとしては、
get_Parameterを使用する場合:- ビルトインパラメータを使用する場合。
- パラメータ名が言語やカスタマイズに依存しない場合。
LookupParameterを使用する場合:- ユーザーが定義したカスタムパラメータを使用する場合。
- パラメータ名が分かっている場合。
になりますが、ここで2つ注意点があります。
1.この状態で取得した面積は、フィートになります。Revitの内部単位はフィートなので、壁エレメントの面積パラメータの値が異なります。この出力の値をフィートからメートルに変換しないといけません。Dynamo上の既存ノードに単位のコンバートノードがありますが、今回はコード上で単位の変換をかけてみましょう。
2.取得した値は文字列なので、AsDouble()メソッドを使用してdouble型で取得する必要があります。
|
1 2 3 4 5 6 7 8 9 10 11 12 13 14 15 16 |
private static double CalculateWallArea(Wall wall) { if (wall != null) { // パラメータ名を使用して壁の面積を取得 Parameter areaParam = wall.LookupParameter("面積"); if (areaParam != null) { // フィートから平方メートルに変換 double areaInSquareFeet = areaParam.AsDouble(); double areaInSquareMeters = UnitUtils.Convert(areaInSquareFeet, UnitTypeId.SquareFeet, UnitTypeId.SquareMeters); return areaInSquareMeters; } } return 0; } |
壁のIDから面積を取得するDynamoノードを作成します。現在のRevitドキュメントから指定された壁IDの壁エレメントを取得しています。
|
1 2 3 4 5 6 7 8 9 10 11 |
// Dynamo用にエクスポートするメソッド [IsVisibleInDynamoLibrary(true)] public static double GetWallAreaById(int id) { Document doc = DocumentManager.Instance.CurrentDBDocument; Element element = doc.GetElement(new ElementId(id)); Wall wall = element as Wall; return CalculateWallArea(wall); } } } |
コーディングが完了したら、Visual Studioでプロジェクトをビルドします。ビルドが成功すると、指定したプロジェクトフォルダ内の「bin\Debug」または「bin\Release」ディレクトリにDLLファイルが生成されます。
Dynamoを開き、[ファイル] タブから「ライブラリを読み込む」を選択し、生成したDLLファイルを選択してインポートします。
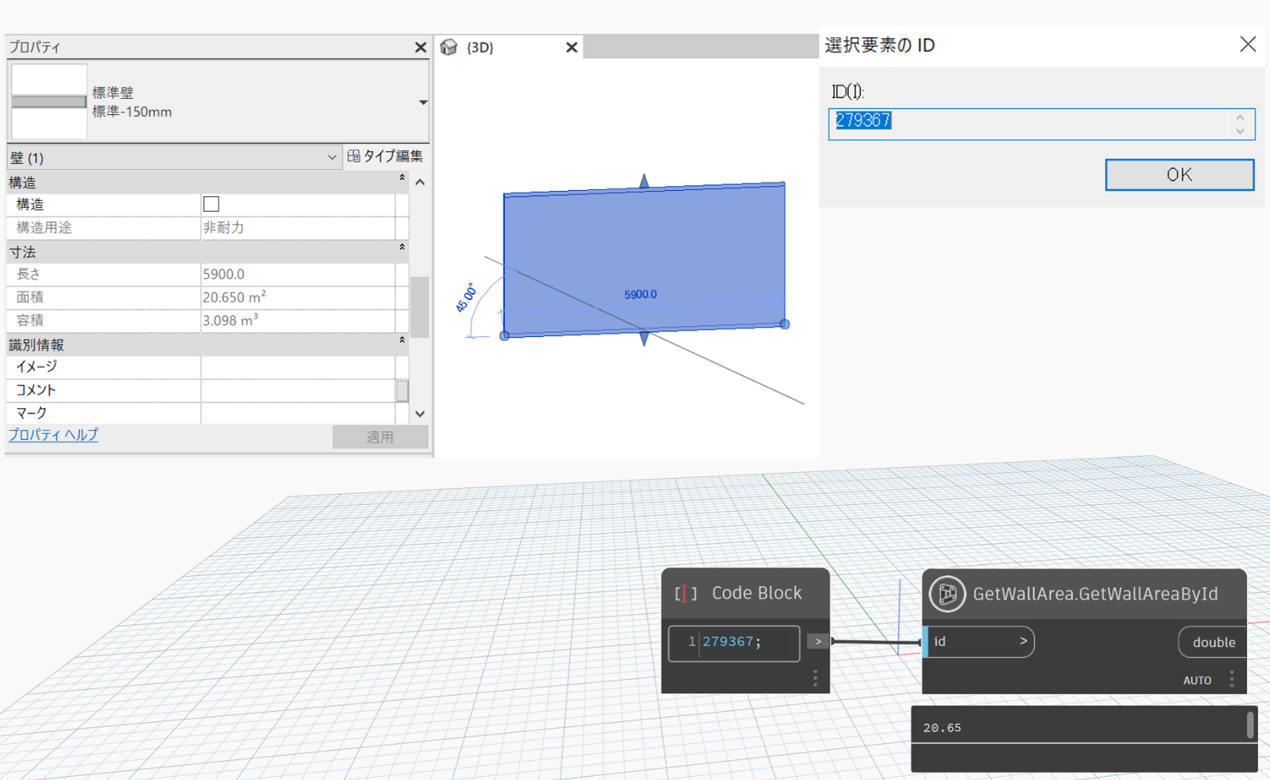
インポート後、新しいノード(カスタムノード)として「GetWallArea.GetWallAreaById」が利用可能になりましたので、配置してみます。
壁IDからその壁の面積を取得することができました。
ただこのままだと壁IDを入力する必要があり、少々面倒なので、選択した壁の面積を取得してみます。
Dynamoの既存ノードであるselect model element(s)ノードとelement.idノード、これらを組み合わせて選択した壁の面積を取得することもできますが、今回はコード上で作成してみましょう。
こちらが修正したコードになります。
|
1 2 3 4 5 6 7 8 9 10 11 12 13 14 15 16 17 18 19 20 21 22 23 24 25 26 27 28 29 30 31 32 33 34 35 36 37 38 39 40 41 42 43 44 45 46 47 48 49 50 51 52 53 54 55 |
using System; using Autodesk.Revit.DB; using Autodesk.Revit.UI; using Autodesk.DesignScript.Runtime; using RevitServices.Persistence; using RevitServices.Transactions; namespace RevitZeroTouch { public class GetWallArea { // コンストラクタ private GetWallArea() { } // 壁の面積を取得し、平方メートルに変換するメソッド private static double CalculateWallArea(Autodesk.Revit.DB.Wall wall) { if (wall != null) { // パラメータ名を使用して壁の面積を取得 Autodesk.Revit.DB.Parameter areaParam = wall.LookupParameter("面積"); if (areaParam != null) { // フィートから平方メートルに変換 double areaInSquareFeet = areaParam.AsDouble(); double areaInSquareMeters = UnitUtils.Convert(areaInSquareFeet, UnitTypeId.SquareFeet, UnitTypeId.SquareMeters); return areaInSquareMeters; } } return 0; } // 壁を選択し、面積を取得するメソッド [IsVisibleInDynamoLibrary(true)] public static double GetSelectedWallArea() { UIDocument uidoc = DocumentManager.Instance.CurrentUIApplication.ActiveUIDocument; Autodesk.Revit.DB.Document doc = uidoc.Document; try { // 壁を選択 Reference pickedRef = uidoc.Selection.PickObject(Autodesk.Revit.UI.Selection.ObjectType.Element, "Select a wall"); Autodesk.Revit.DB.Element element = doc.GetElement(pickedRef.ElementId); Autodesk.Revit.DB.Wall wall = element as Autodesk.Revit.DB.Wall; return CalculateWallArea(wall); } catch (Autodesk.Revit.Exceptions.OperationCanceledException) { // ユーザーが選択をキャンセルした場合 return 0; } } } } |
大きく修正した箇所の説明をします。
今回はRevit上の壁を選択する必要があるので、新しくメソッドを作成します。
UIDocumentは、RevitのUIに関連する操作を実行するためのクラスです。現在アクティブなRevitのUIドキュメントを取得します。
uidoc.Selectionは、UIDocumentクラスのSelectionプロパティで、ユーザーの現在の選択を管理するためのSelectionオブジェクトを取得します。
PickObject メソッドは、 Selectionオブジェクトのメソッドで、ユーザーにエレメントを選択させるためのものです。引数には、選択するオブジェクトの種類を指定するものと、ユーザーに表示されるメッセージの2つがあります。
選択したエレメントがReferenceクラスのオブジェクトとして格納されます。
|
1 2 3 4 5 6 7 8 9 10 11 12 13 14 15 16 17 18 19 20 |
[IsVisibleInDynamoLibrary(true)] public static double GetSelectedWallArea() { UIDocument uidoc = DocumentManager.Instance.CurrentUIApplication.ActiveUIDocument; Autodesk.Revit.DB.Document doc = uidoc.Document; try { // 壁を選択 Reference pickedRef = uidoc.Selection.PickObject(Autodesk.Revit.UI.Selection.ObjectType.Element, "Select a wall"); Autodesk.Revit.DB.Element element = doc.GetElement(pickedRef.ElementId); Autodesk.Revit.DB.Wall wall = element as Autodesk.Revit.DB.Wall; return CalculateWallArea(wall); } catch (Autodesk.Revit.Exceptions.OperationCanceledException) { // ユーザーが選択をキャンセルした場合 return 0; } } |
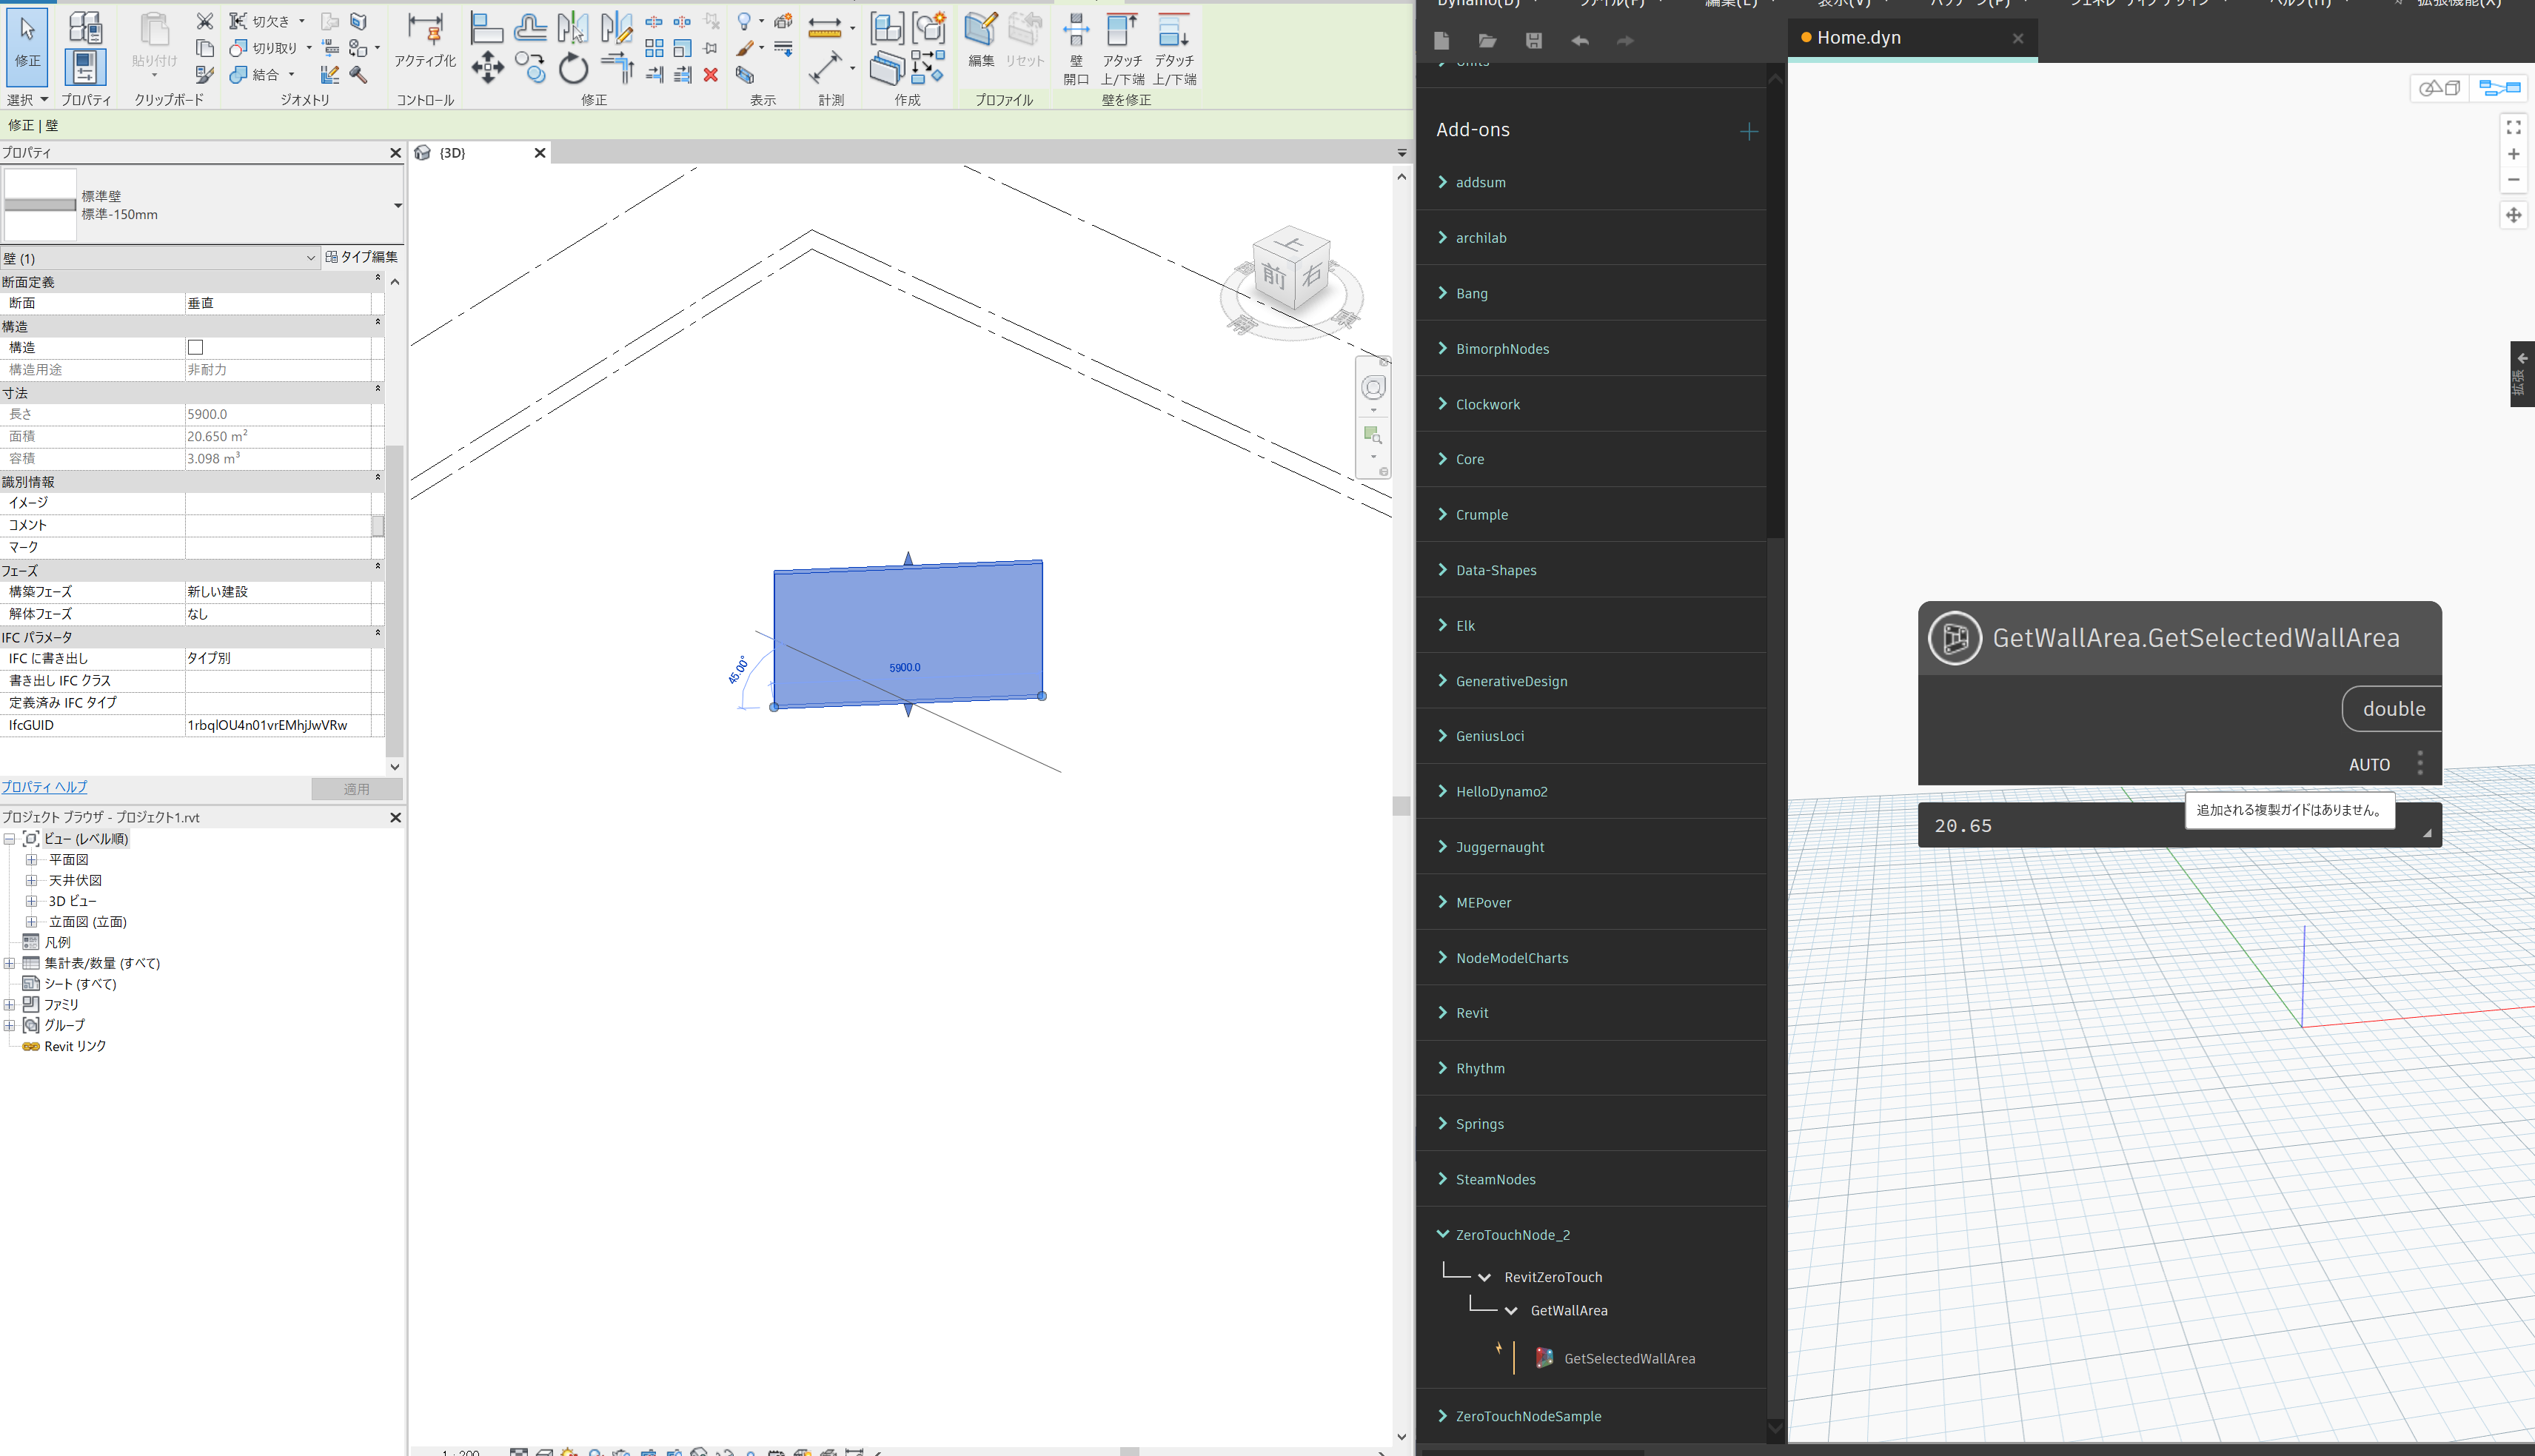
再びビルドして、Dynamoを実行します。
実行するとRevit上で壁を選択するステップに入るので、任意の壁を選択します。選択するとノードのアウトプットにその壁の面積が取得されます。
今回は、ZeroTouch Nodeを使用して、Revitエレメントを参照する方法、Revitエレメントのパラメータを取得する方法を説明しました。
次回は、第3弾で、ZeroTouch Nodeを使用してRevitエレメントを作成するお話をしていきます。





COMMENTS