皆様こんにちは
AMDlabの秋山です。
前回に引き続きZeroTouch Nodeの第3弾です。
今回は、ZeroTouch Nodeを使用して、Revitエレメント(システムファミリ)を作成する方法をお話していきます。
今回作成するノードは
1.壁作成
2.床作成
の2つになります。
1.壁作成
以下が今回作成するコードになります。
|
1 2 3 4 5 6 7 8 9 10 11 12 13 14 15 16 17 18 19 20 21 22 23 24 25 26 27 28 29 30 31 32 33 34 35 36 37 38 39 40 41 42 43 44 45 46 47 48 49 50 51 52 53 54 55 56 57 58 59 60 61 62 63 64 65 66 67 68 69 |
using Autodesk.DesignScript.Geometry; using Autodesk.Revit.DB; using Dynamo.Graph.Nodes; using RevitServices.Persistence; using RevitServices.Transactions; using Revit.Elements; using System; using System.Collections.Generic; using Autodesk.DesignScript.Runtime; namespace RevitCreation { public static class WallCreation { [IsVisibleInDynamoLibrary(true)] public static List<Revit.Elements.Element> CreateWalls( Revit.Elements.WallType wallTypeElement, Revit.Elements.Level levelElement, List<Autodesk.DesignScript.Geometry.Line> lines, double heightInMillimeters) { Document doc = DocumentManager.Instance.CurrentDBDocument; // Revit.Elements.WallType から Autodesk.Revit.DB.WallType に変換 var revitWallType = wallTypeElement.InternalElement as Autodesk.Revit.DB.WallType; var revitLevel = levelElement.InternalElement as Autodesk.Revit.DB.Level; if (revitWallType == null || revitLevel == null || lines == null || lines.Count == 0) { throw new ArgumentException("無効です."); } List<Revit.Elements.Element> walls = new List<Revit.Elements.Element>(); // 高さをミリメートルからフィートに変換 double heightInFeet = UnitUtils.ConvertToInternalUnits(heightInMillimeters, UnitTypeId.Millimeters); TransactionManager.Instance.EnsureInTransaction(doc); foreach (var line in lines) { // DynamoのLineからRevitのLineに変換 XYZ startPoint = new XYZ( UnitUtils.ConvertToInternalUnits(line.StartPoint.X, UnitTypeId.Millimeters), UnitUtils.ConvertToInternalUnits(line.StartPoint.Y, UnitTypeId.Millimeters), UnitUtils.ConvertToInternalUnits(line.StartPoint.Z, UnitTypeId.Millimeters) ); XYZ endPoint = new XYZ( UnitUtils.ConvertToInternalUnits(line.EndPoint.X, UnitTypeId.Millimeters), UnitUtils.ConvertToInternalUnits(line.EndPoint.Y, UnitTypeId.Millimeters), UnitUtils.ConvertToInternalUnits(line.EndPoint.Z, UnitTypeId.Millimeters) ); Autodesk.Revit.DB.Line wallLine = Autodesk.Revit.DB.Line.CreateBound(startPoint, endPoint); // 壁を作成 Autodesk.Revit.DB.Wall wall = Autodesk.Revit.DB.Wall.Create(doc, wallLine, revitWallType.Id, revitLevel.Id, heightInFeet, 0, false, false); // 作成した壁をリストに追加 walls.Add(wall.ToDSType(true)); } TransactionManager.Instance.TransactionTaskDone(); // 作成された壁のリストを返す return walls; } } } |
上記のコードを簡単に解説していきます。
まず初めに名前空間をインポートします。ライブラリやフレームワークの特定部分を参照するために記述します。
|
1 2 3 4 5 6 7 8 9 |
using Autodesk.DesignScript.Geometry; using Autodesk.Revit.DB; using Dynamo.Graph.Nodes; using RevitServices.Persistence; using RevitServices.Transactions; using Revit.Elements; using System; using System.Collections.Generic; using Autodesk.DesignScript.Runtime; |
クラスを定義します。
|
1 2 3 4 5 |
namespace RevitCreation { public static class WallCreation { [IsVisibleInDynamoLibrary(true)] |
メソッドの定義をします。
このメソッドは、複数のDynamoジオメトリ(line)から壁を作成し、作成された壁のリストを返します。
|
1 2 3 4 5 |
public static List<Revit.Elements.Element> CreateWalls( Revit.Elements.WallType wallTypeElement, Revit.Elements.Level levelElement, List<Autodesk.DesignScript.Geometry.Line> lines, double heightInMillimeters) |
次に、Revitエレメントを取得していきます。
注意点がひとつあります。
Dynamoで受け取ったWallTypeとLevelは、Dynamo専用のクラス(Revit.Elements.WallTypeとRevit.Elements.Level)として表されています。これらはDynamo内で操作しやすくするためのラッパーされたものです。
しかし、Revitの操作にはRevitAPIのオブジェクト(Autodesk.Revit.DB.WallTypeやAutodesk.Revit.DB.Level)が必要なので下記の内容を使い変換する必要があります。
https://x.com/tatsukikouno/status/1730628732573151406?s=46&t=Pk8diAgErdWbxoxtWxa64w
|
1 2 |
var revitWallType = wallTypeElement.InternalElement as Autodesk.Revit.DB.WallType; var revitLevel = levelElement.InternalElement as Autodesk.Revit.DB.Level; |
次に、Autodesk.Revit.DB.Wall.Create() メソッドを使用して壁を作成します。
このメソッドには、単位変換されたLine、指定されたWallType、Level、および単位変換された高さを引数として渡します。
単位変換については前回お話しした内容を参考にしてください。
今回新たに加わる内容として、ToDSType メソッドの使用があります。このメソッドは、Revit APIのオブジェクト(例えばAutodesk.Revit.DB.Wall)をDynamo専用のラッパークラス(例えばRevit.Elements.Wall)に変換します。
これにより、Revit APIオブジェクトをDynamoの環境内で操作しやすくするためのラッピングが行われます。
|
1 2 3 4 5 6 7 8 9 10 11 12 13 14 15 16 17 18 19 20 21 |
List<Revit.Elements.Element> walls = new List<Revit.Elements.Element>(); double heightInFeet = UnitUtils.ConvertToInternalUnits(heightInMillimeters, UnitTypeId.Millimeters); foreach (var line in lines) { XYZ startPoint = new XYZ( UnitUtils.ConvertToInternalUnits(line.StartPoint.X, UnitTypeId.Millimeters), UnitUtils.ConvertToInternalUnits(line.StartPoint.Y, UnitTypeId.Millimeters), UnitUtils.ConvertToInternalUnits(line.StartPoint.Z, UnitTypeId.Millimeters) ); XYZ endPoint = new XYZ( UnitUtils.ConvertToInternalUnits(line.EndPoint.X, UnitTypeId.Millimeters), UnitUtils.ConvertToInternalUnits(line.EndPoint.Y, UnitTypeId.Millimeters), UnitUtils.ConvertToInternalUnits(line.EndPoint.Z, UnitTypeId.Millimeters) ); Autodesk.Revit.DB.Line wallLine = Autodesk.Revit.DB.Line.CreateBound(startPoint, endPoint); Autodesk.Revit.DB.Wall wall = Autodesk.Revit.DB.Wall.Create(doc, wallLine, revitWallType.Id, revitLevel.Id, heightInFeet, 0, false, false); walls.Add(wall.ToDSType(true)); } |
コーディングが完了したら、Visual Studioでプロジェクトをビルドします。ビルドが成功すると、指定したプロジェクトフォルダ内の「bin\Debug」または「bin\Release」ディレクトリにDLLファイルが生成されます。
Dynamoを開き、[ファイル] タブから「ライブラリを読み込む」を選択し、生成したDLLファイルを選択してインポートします。
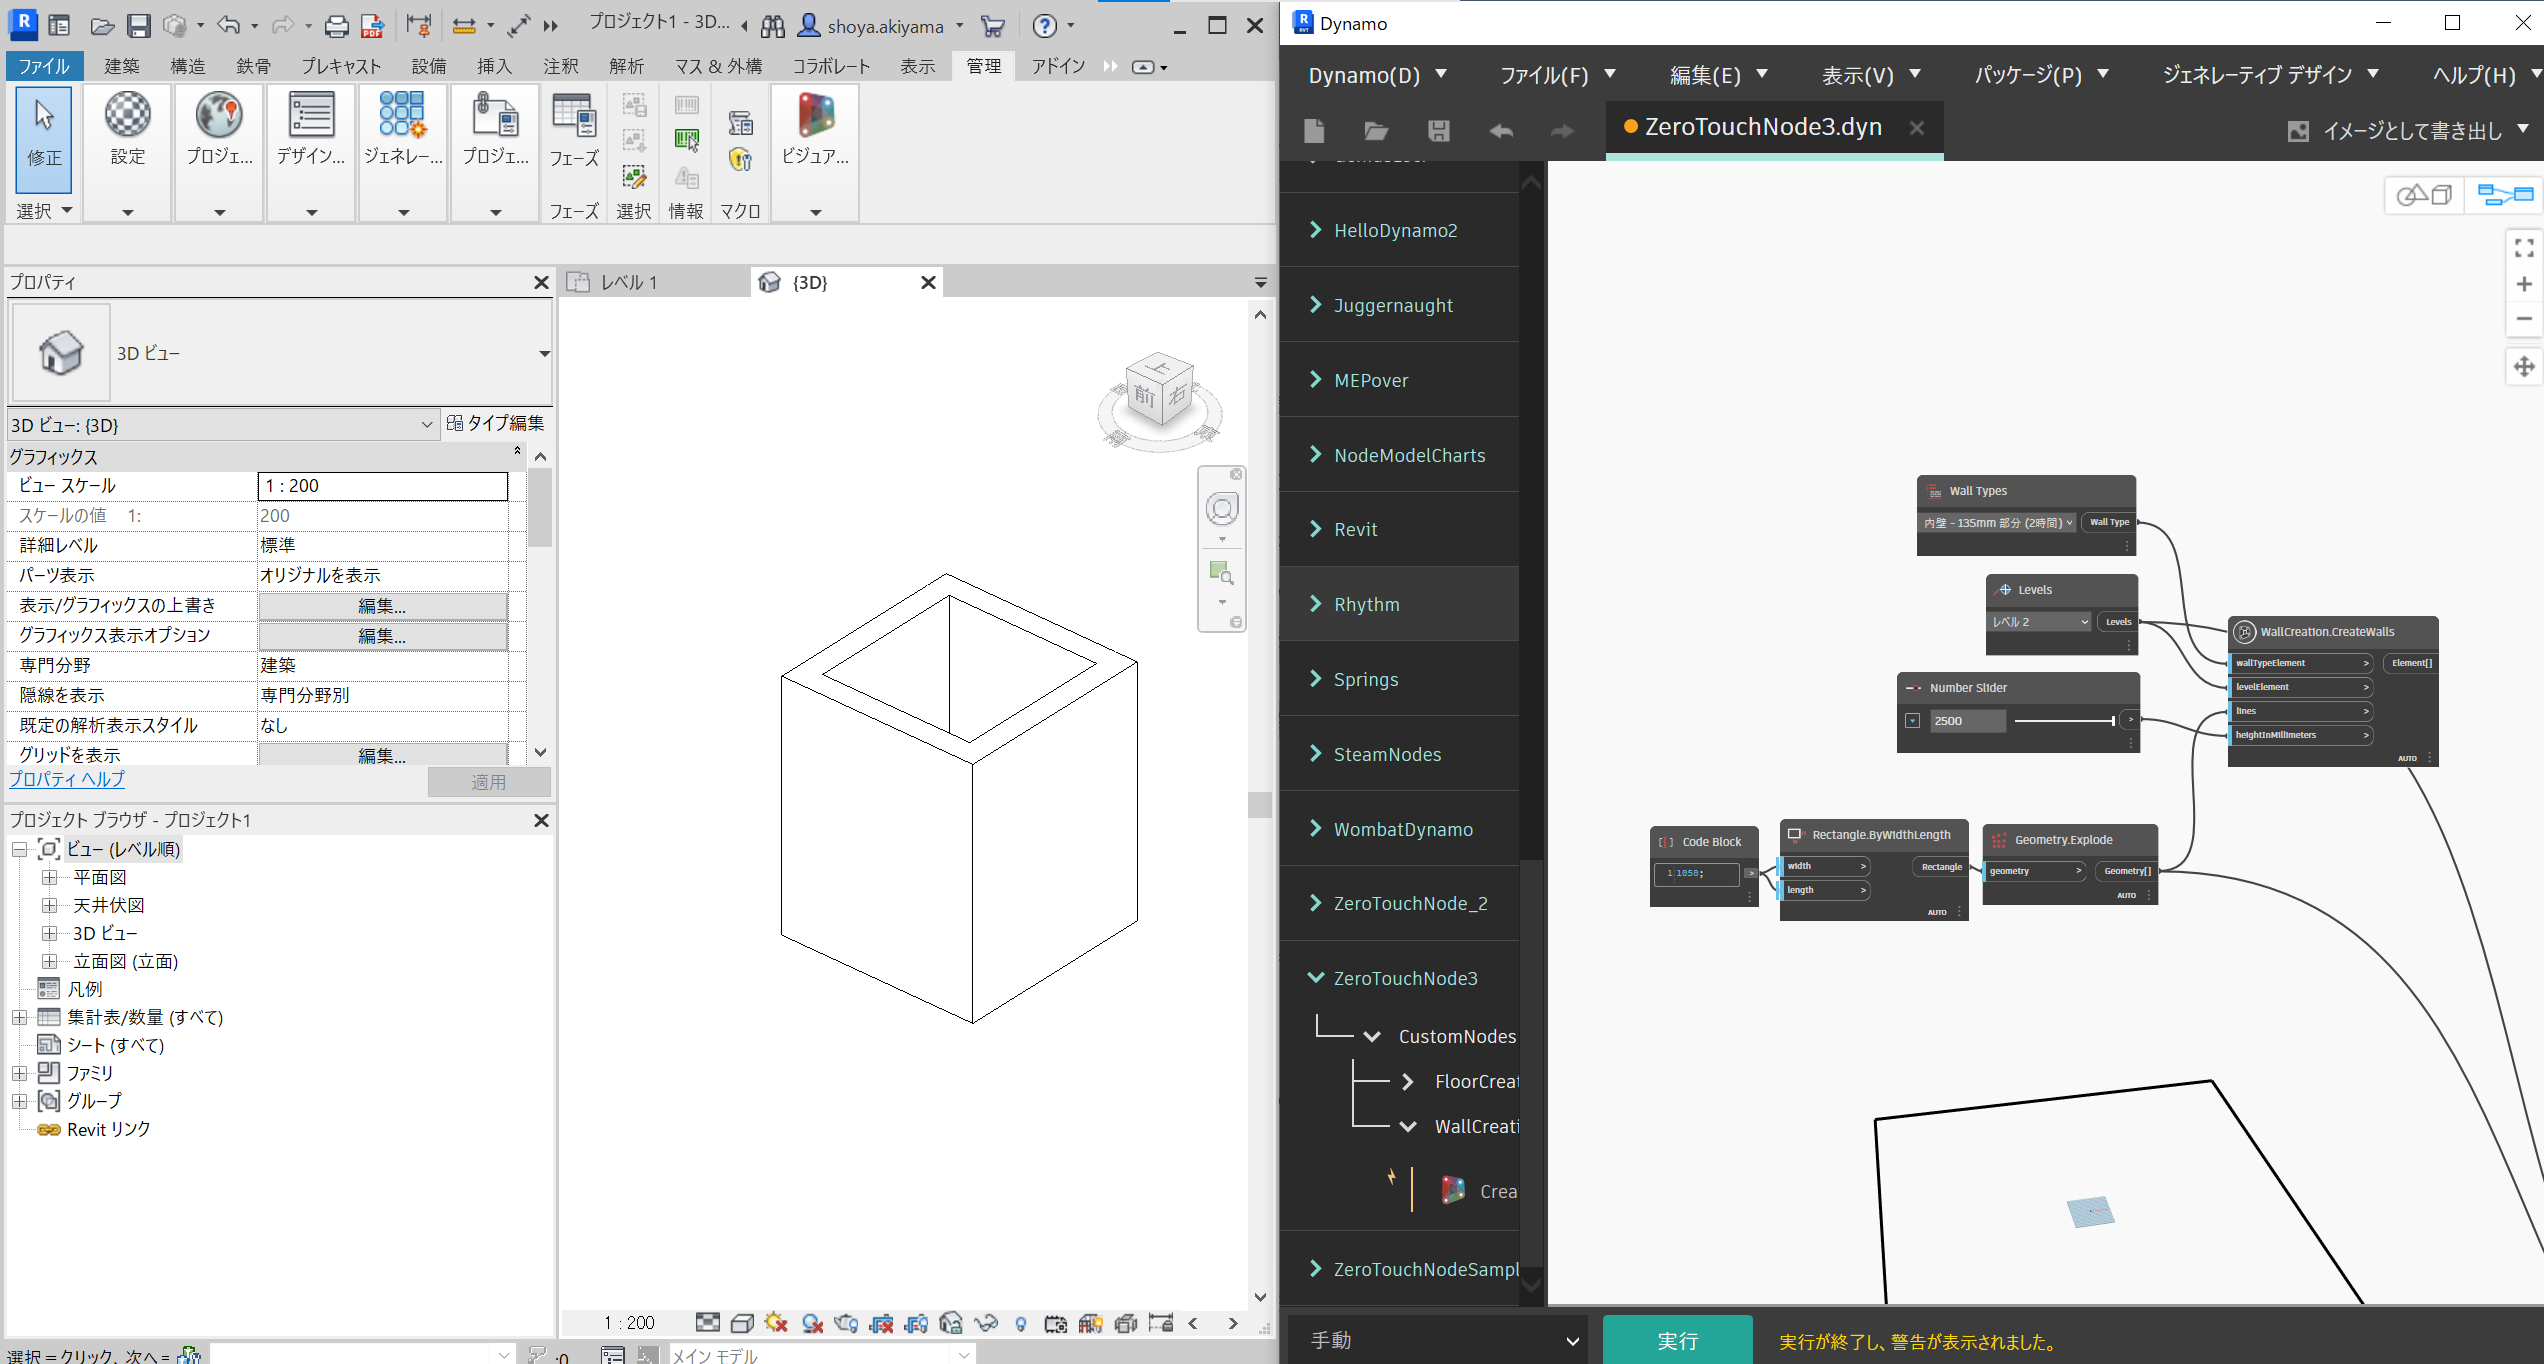
インポート後、新しいノード(カスタムノード)として「WallCreation.CreateWalls」が利用可能になりましたので、配置してみます。
壁が作成されました。
続いてはこの壁の線分を使用して床を作成していきます。
2.床作成
以下が今回作成するコードになります。
|
1 2 3 4 5 6 7 8 9 10 11 12 13 14 15 16 17 18 19 20 21 22 23 24 25 26 27 28 29 30 31 32 33 34 35 36 37 38 39 40 41 42 43 44 45 46 47 48 49 50 51 52 53 54 55 56 57 58 59 60 61 62 63 64 65 66 67 |
using Autodesk.DesignScript.Geometry; using Autodesk.Revit.DB; using Dynamo.Graph.Nodes; using RevitServices.Persistence; using RevitServices.Transactions; using Revit.Elements; using System; using System.Collections.Generic; using Autodesk.DesignScript.Runtime; namespace RevitCreation { public static class FloorCreation { [IsVisibleInDynamoLibrary(true)] public static Revit.Elements.Element CreateFloor( Revit.Elements.FloorType floorTypeElement, Revit.Elements.Level levelElement, List<Autodesk.DesignScript.Geometry.Line> lines) { Document doc = DocumentManager.Instance.CurrentDBDocument; // Revit.Elements.FloorType から Autodesk.Revit.DB.FloorType に変換 var revitFloorType = floorTypeElement.InternalElement as Autodesk.Revit.DB.FloorType; var revitLevel = levelElement.InternalElement as Autodesk.Revit.DB.Level; if (revitFloorType == null || revitLevel == null || lines == null || lines.Count == 0) { throw new ArgumentException("無効です."); } // DynamoのLineからRevitのCurveLoopに変換 List<CurveLoop> curveLoops = new List<CurveLoop>(); CurveLoop curveLoop = new CurveLoop(); foreach (var line in lines) { XYZ startPoint = new XYZ( UnitUtils.ConvertToInternalUnits(line.StartPoint.X, UnitTypeId.Millimeters), UnitUtils.ConvertToInternalUnits(line.StartPoint.Y, UnitTypeId.Millimeters), UnitUtils.ConvertToInternalUnits(line.StartPoint.Z, UnitTypeId.Millimeters) ); XYZ endPoint = new XYZ( UnitUtils.ConvertToInternalUnits(line.EndPoint.X, UnitTypeId.Millimeters), UnitUtils.ConvertToInternalUnits(line.EndPoint.Y, UnitTypeId.Millimeters), UnitUtils.ConvertToInternalUnits(line.EndPoint.Z, UnitTypeId.Millimeters) ); Autodesk.Revit.DB.Line revitLine = Autodesk.Revit.DB.Line.CreateBound(startPoint, endPoint); curveLoop.Append(revitLine); } curveLoops.Add(curveLoop); TransactionManager.Instance.EnsureInTransaction(doc); // 床を作成 bool structural = false; double slope = 0.0; Autodesk.Revit.DB.Line slopeArrow = null; // スロープ付きの床が必要ない場合は null Autodesk.Revit.DB.Floor floor = Autodesk.Revit.DB.Floor.Create(doc, curveLoops, revitFloorType.Id, revitLevel.Id, structural, slopeArrow, slope); TransactionManager.Instance.TransactionTaskDone(); // DynamoのRevitエレメントとして返す return floor.ToDSType(true); } } } |
上記のコードを今回も簡単に解説していきます。壁作成と内容が同じ箇所は省略します。
まず初めにメソッドの定義をします。
このメソッドは、複数のDynamoジオメトリ(line)から床の境界線を作成し、作成された床を返します。
|
1 2 3 4 |
public static Revit.Elements.Element CreateFloor( Revit.Elements.FloorType floorTypeElement, Revit.Elements.Level levelElement, List<Autodesk.DesignScript.Geometry.Line> lines) |
次に床を作成していきます。使用するメソッドはAutodesk.Revit.DB.Floor.Create()です。
単位変換されたLine、指定されたFloorType、Level、床の傾斜、傾斜の方向、構造要素を引数に用いて、床を作成します。
|
1 2 3 4 5 6 7 8 9 10 11 12 13 14 |
// 床を作成 bool structural = false; double slope = 0.0; Autodesk.Revit.DB.Line slopeArrow = null; // スロープ付きの床が必要ない場合は null Autodesk.Revit.DB.Floor floor = Autodesk.Revit.DB.Floor.Create(doc, curveLoops, revitFloorType.Id, revitLevel.Id, structural, slopeArrow, slope); TransactionManager.Instance.TransactionTaskDone(); // DynamoのRevitエレメントとして返す return floor.ToDSType(true); } } } |
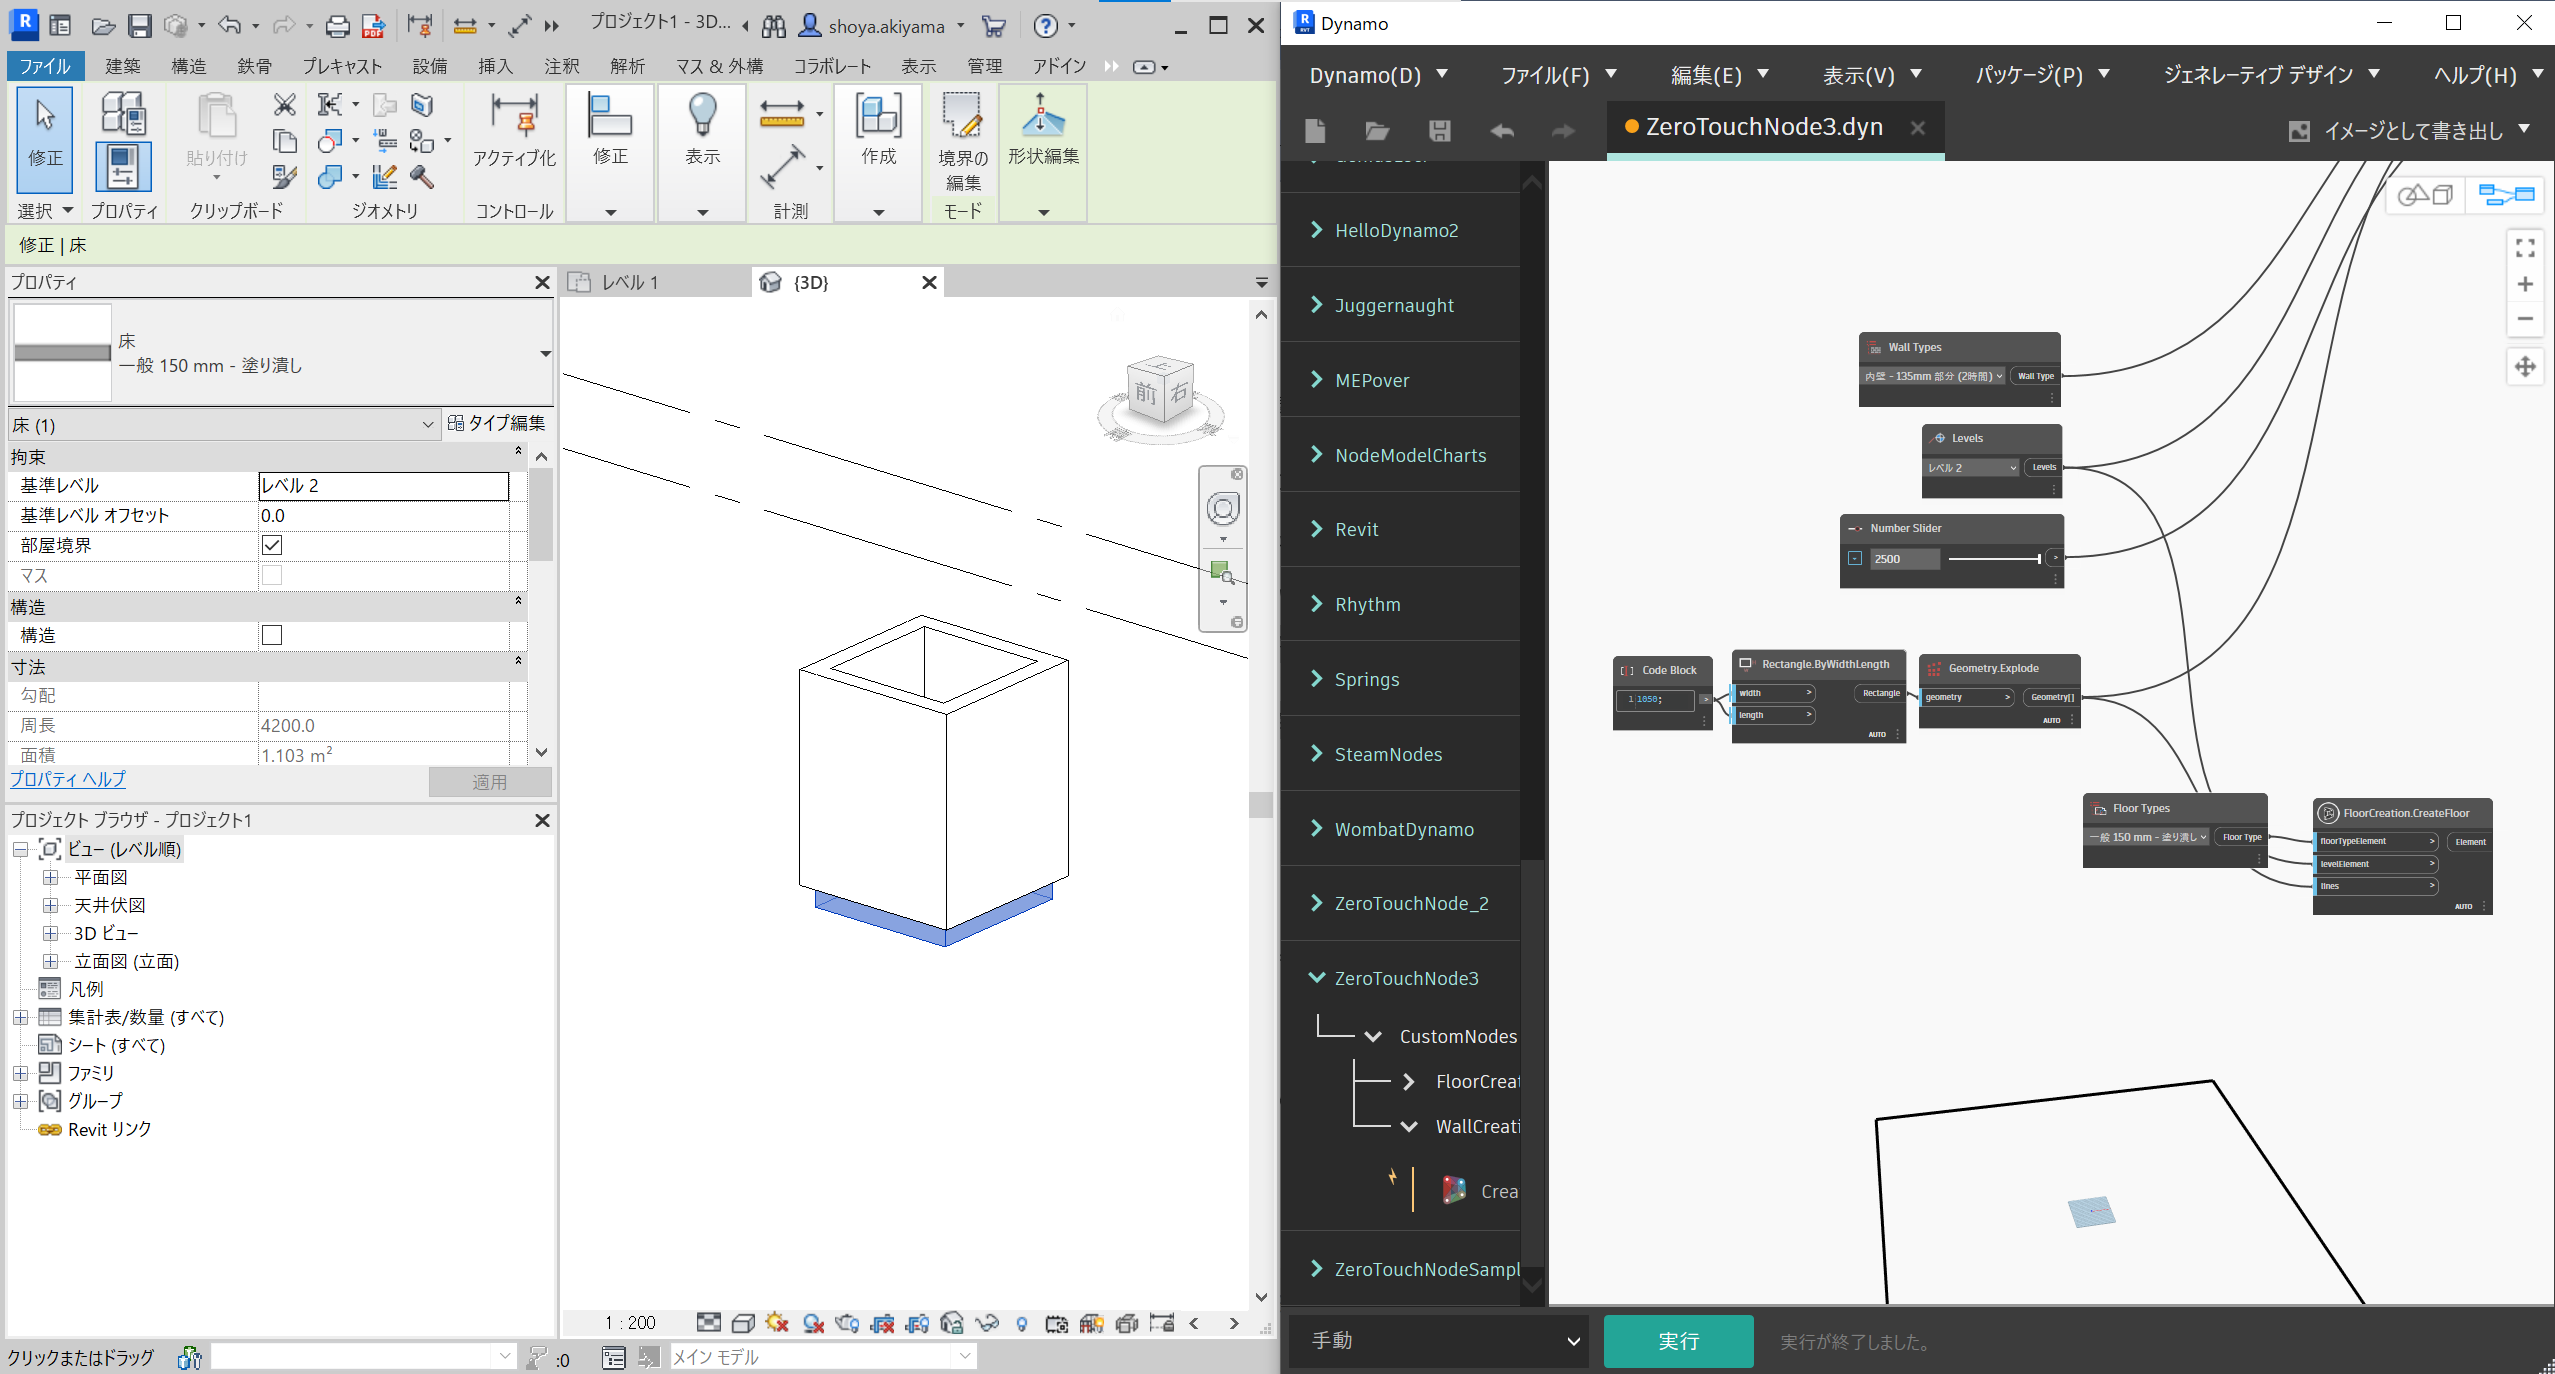
コーディングが完了したら、先ほど同様ビルドをし「FloorCreation.CreateFloor」を配置してみます。
床が作成されました。
今回は、ZeroTouch Nodeを使用して、Revitエレメント(システムファミリ)を作成する方法を説明しました。
次回は、第4弾で、ZeroTouch Nodeを使用してRevitエレメント(コンポーネントファミリ)を作成するお話をしていきます。






COMMENTS